7.31.2009

Grants Farm.

Anheuser-Busch has a farm
Free B-E-E-R-S.
Photobucket

With Ulysses S. Grant's log cabin here,
Photobucket

and an upcycled rifle barrel fence that was composed of 2,563 Civil War rifles there,
Photobucket

here is a very fluffy chicken,
Photobucket

there is me feeding a goat,
Photobucket

everywhere are scary concrete people carvings.
Photobucket

Anheuser- Busch had a farm and we had a very fun day!

OK I know that was a totally silly post but it reflects the totally silly fun day Ryan, the girls, and I had today.

7.30.2009

Inspired.

Today I felt inspired.

So instead of doing housework I made this

Photobucket

using this as my inspiration.


and these

Photobucket

to go along with the ones Olivia made me for Mother's Day.


The two go nicely together don't they?

Photobucket

Photobucket

and while I was still feeling inspired I decided to makes these

Photobucket

using this as my inspiration.

What inspires you?

7.29.2009

Crawling.

Where has the time gone?

It feels like yesterday, on the 1st snow of the season, that my sweet Eliana was born. The day I sat in bed staring at her beautiful face, nursing her, promising myself that I was going to embrace every second I have with her.

Photobucket

Now, 8 months later, I can honestly say that I have kept my promise. I know that she may possibly be my last child and I want to be able to look back and remember every second of her infancy.

Last night something happened.


Photobucket

My sweet little baby started crawling.

This is a bittersweet moment for me. I am happy that she is reaching developmental milestones but it also scares me to no end. Not because I now have to hide cords, relocate breakables, and constantly sweep the floors and vacuum the rugs. It scares me because it means she is actually growing up. It means that one day, not too long from now, she will no longer want to snuggle and nurse while we watch America's Got Talent. She will no longer smile then shyly hide her face in my armpit in the presence of a stranger. It means that she will soon be too big to take a bath in the kitchen sink. It means I have to except the fact that she will not be a baby forever.

7.28.2009

Manly Vegetarian Food.

Ryan is a champ. He eats every single crazy recipe that I serve him and he never complains no matter how girly the food is. So I decided to make him a man meal. During my jog I was running(haha) ideas through my head and came up with the idea of vegetarian "meatball" subs. I went to the store all stinky an sweaty and grabbed 2 loves of french bread, a package of Match-ground beef without the beef, some provolone cheese, and a jar of Classico marinara with plum tomatoes. Then I went home and got to work.

1st I whipped up a batch of Betsy's Balls. Betsy is an internet mommy friend of mine and everyone raves about her balls. Thanks to Match, I got to try them too and they are yummy!

Ingredients:

Photobucket

First, mix all the ingredients together, form into balls, and cook in the oven for 15 minutes.

Photobucket

Next, transferred the balls into a pan with the marinara sauce and let them simmer for another 15 minutes.

Photobucket

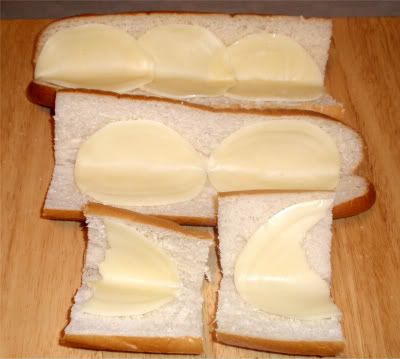
While the balls are simmering. Prepare you subs. Cut the french bread into the size you want your sub to be and line with the provolone cheese.

Photobucket


Put some balls and sauce into the subs, place in the oven for a few minutes to toast the bread and melt the cheese, plate them up with some homemade potato chips and serve!

Photobucket

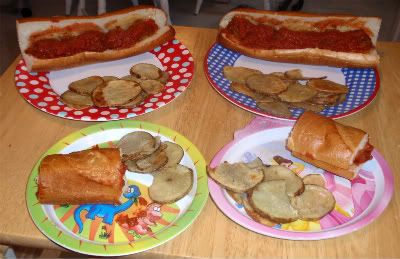
Ryan really loved these and I could tell by the look on his face that he felt every bit like a carnivorous manly man. :)


Betsy's Balls- Vegetarian style.

1 package Match ground beef without the beef (Betsy makes hers with 1 1/2 lbs ground turkey)
½ C dry breadcrumbs
½ C finely shredded fresh Parmesan cheese
1/3 C finely chopped green onions( I never use these because I don't like them)
¼ C coarsely shredded carrot
¼ C coarsely shredded zucchini
¼ C chopped fresh parsley
¼ tsp salt
¼ tsp pepper
1 large egg white
2 garlic cloves, crushed


1) Preheat oven to 400°
2) Combine all ingredients except cooking spray in a large bowl; stir well.
3)form mixture into balls and place on a cookie sheet coated with cooking spray.
4)Bake at 400° for 15 minutes or until done.

Homemade potato chips
2 large potatoes
vegetable oil
salt
pepper

1) cut potatoes into thin slices. If you have a slicer great! but you don't need one.
2) toss them in a bowl with a generous amount of vegetable oil
3)lay the slices out on a cookie sheet in a single layer
4)sprinkle with salt and pepper.
5)bake at 400* until slices are crispy.( takes me 30 minutes or so)
6)let cool and serve

7.27.2009

Eco Friendly home products.

I know there are a lot of people out there who want to go green but don't want to sacrifice performance. I am one of those people. To do our part in saving our Earth we use bamboo towels instead of paper towels, and we use washcloths(with ice cream cones on them) instead of paper napkins. I use reusable grocery and produce bags instead of plastic, and I buy foods in the bulk bins to cut cost and needless packaging but when it comes to my clothes and dishes I just couldn't do the green stuff. I never felt like it got my clothes or my dishes clean enough. Until now.

Meet Purex Natural Elements.


This is BY FAR the BEST Eco-friendly detergent I have EVER used. It smells great, it gets my clothes clean, gets stains out, comes in an HE version....Everything I have ever wanted in a laundry detergent. Im in love. Purex Natural Elements is the first mass laundry brand with EPA recognition. The plant-based surfactants in Purex's Natural Elements detergent are sourced from nature's renewable resources, including natural fragrance extracts and naturally softened water. Both the detergent and liquid fabric softener have biodegradable, concentrated formulas that requires 50 percent less liquid per dose and a recyclable bottle, and it is also hypoallergenic and dye-free. (sited from Purexsavesgreen.com). If you want to try Purex Natural Elements tell a friend and get a coupon.

I have not tired the fabric softener yet but I will after I run out of this great product.

Meet Ecover Fabric Softener.


I originally bought Ecover to soften Ellie's cloth diapers. It wasn't until I left some clothes in the washer for a couple days (What? It happens!). I re-ran the colthes through a rinse cycle with some Ecover to freshen them up a bit and OMG! My clothes came out silky soft and smelling fresh. Instant love. Ecover is made with plant and mineral ingredients, has minimum impact on aquatic life, is completely biodegradability, and is HE washer compatible. Here is a coupon for Ecover.

Who hates doing the dishes? I DO!!!! But it makes me happy when I run my dishwasher with this.

Meet Palmolive Eco+.


In my opinion all those natural dish washing detergents out there just do not work well. I've tried several of them and was not impressed and felt like I wasted my money. Palmolive Eco + is not exactly Eco-friendly because it has chlorine bleach in it BUT it is phosphate free so less harmful chemicals are getting dumped back into our water sources . At least by using this product I am getting clean dishes and I am taking a small step in keeping our planet clean. Want a coupon? Sorry. I posted a link to a coupon earlier but now its gone :(

I hope you find these reviews helpful and that you utilize the coupons and give these products a try :)

7.26.2009

M-M-M My Toyota.

Photobucket

This is my Toyota Sienna.

The van I fought and fought and finally broke down and bought 15 days before Eliana was born and she was 5 days overdue.

Why the Toyota?

Easy.
It drove like my Subaru.
I LOVE my Subaru- Thank You Ryan for keeping it.

What sets my Sienna apart from all the other Siennas that every other mom is driving?

Stickers.

Everyone asks why I let Isabela put stickers all over the window of my brand new car.
The answer is simple.
I did not let her put the stickers there.
Ryan let her put the stickers there while I was in the hospital recovering from a wicked C-Section and I'm too lazy to climb back there with the Goo Gone to remove them.

Besides, the stickers have grown on me.
I can quickly pin point the location of my van in a sea of other vans by looking for those stickers.
Plus they add character. :)

7.23.2009

Carpool etiquette .

Dear mama in the tan KIA Sedona,

I know you are not from the US and maybe they do carpool differently in Israel but it is a bit rude to drive around and pull up right in front of the 1st car in line and hop out to drop off/pick up your kids. All the other kids have to wait, yours should too. AND if you want to be 1st than you should arrive a few minutes earlier to avoid the line. Now I don't know your situation and maybe you have a valid reason for breaking carpool etiquette but it still annoys me to no end.

Signed,
crankybeforemymorningcoffeekicksin preschool parent.


Dear crazy-in-a-rush parents at Isabela's Elementary School,

Why is it so hard for you all to wait in line? Why do you drive around all the other cars and pull into a spot that someone else who IS in line is waiting for? It is VERY rude. I'm sorry if you are in a hurry and don't want to be late to work or the gym or whatever it is you do after you drop your kids off but can I offer you some advice? How about waking up 15- 20 minutes earlier so you don't have to be in a rush every morning. I guarantee you will feel less stressed and it will make all the other patient parent happy.

Signed,
patient parent waiting in line at carpool.

P.S. If for any reason you have to go into the school with your kid. Don't be lazy. Park your car in a parking spot NOT in the carpool lane. It really messes up the already messed up flow and makes everyone mad. Thanks!

7.22.2009

The Garden- Week 7.

What happens to your garden when you ask your mom to water it while you are out of town and she forgets?


IT GROWS!!!!


We've got strawberries!

Photobucket

We've got Jimbo tomatoes!

Photobucket

We've got vine tomatoes!

Photobucket

We've got green peppers!

Photobucket


They are all small but they are there.

I guess we were watering the garden too much.

Thanks for forgetting mom!!!


7.21.2009

Roasted Banana Coconut Ice Cream- Dairy Free.

Last week when I made my yummy lavender and honey ice cream I got a comment from Julie saying that one of her daughters has a dairy sensitivity and my friend Kate also mentioned her dairy sensitivity. Julie and Kate (and all the other lactose intolerant people out there) this ones for you!!!!

This recipe is from Elana's Pantry. It is dairy free, and uses no refined sugar ( I love that part!).

Ingredients
4-5 ripe organic bananas
2 dates, pitted
2 tbsp. organic coconut oil
1 13.5 oz. can coconut milk
1 tbsp. organic vanilla

Photobucket
** I use organic ingredients whenever I can. In this case I could not get organic dates or organic coconut milk.

The great thing about this recipe is that it gets all its sweetness from roasted fruits, bananas and dates. Peel your bananas, pit your dates and throw them all into a glass baking dish.

Photobucket

If you have never used dates before don't be afraid. Dates, in this case, are dried fruits from date palms. They are very sweet and my family loves snacking on them. You can find dates in the produce section usually in a plastic container. If you can't find them there you can get them in the dried fruit section although they don't taste nearly as good as the fresh ones.

Coconut oil is a great alternative to olive or vegetable oil. It is very mild in taste and has many health benefits. It's a bit expensive but well worth the splurge in my opinion. It is a solid substance right out of the jar so you will have to microwave it for about 15 seconds in a small bowl to melt it.


Photobucket


Pour some vanilla extract into the melted coconut oil. It will have a vinegar and oil effect. Just stir it really fast to mix it up and pour across the bananas and dates.


Photobucket


Bake at 375* for 35 to 40 minutes. When it is done it will look like this:


Photobucket
While in the oven, make sure to check the bananas often. If you burn them they will taste like crap and the whole recipe will be ruined.

Pour the can of coconut milk into your blender and then throw in the bananas and dates. Be sure to use all the juice in the bottom of the baking dish. It is loaded with natural sugars and makes the ice cream even more delicious.


Photobucket

Blend until smooth.

Now you can either pour the mixture directly into your ice cream maker or you can cool it first. I prefer to cool everything first so that it freezes faster. Just personal preference, you can do it however you like.

Let the mixture spin around in your ice cream maker until it has a soft serve consistency (30-40 minutes), transfer your ice cream into a freezer safe container and freeze until solid- about 3 or 4 hours.

Photobucket

So there you have it. A dairy free, naturally sweetened ice cream. Enjoy!!!!

Notes:
If you don't have an ice cream maker you can still make ice cream. Just let the mixture cool, pour into a container and place in the freezer. Go back every hour or so and stir it up until it is soft serve consistency then let it sit for 3 or 4 hours to harden up. It takes longer but it is worth it.

Your composter would love all those banana peels so toss those in there.


Put the date seeds down your garbage disposal and turn it on. They will help sharpen the blades.


Before throwing the coconut milk can into the recycling bin remove the bottom of the can with one of those can openers that does not leave sharp edges. Put it (and the top that you are going to dig out of your trash can right now) in the craft box. You can make garden markers or Christmas ornaments with them.

7.20.2009

Happy Campers.

Instead of staying home this weekend building the garden trellises and clearing out the basement so they can start construction Monday morning we decided to go camping. Our excuse was that it is very rare to get 70 degree, overcast, low humidity weather here in July. The girls had a great time.

Photobucket

Photobucket


Photobucket

We went fishing, explored caves, played in the river.... Great times.

7.17.2009

Yom Israel.

Today at Isabela's camp they are doing a mock tour of Israel.  She is super excited about it and spent the whole night telling me about going to Jerusalem and visiting the dead sea, donating toothbrushes and tooth paste as a mitzvah, bringing in some of her savings for a lap top to donate to Kotel.  Since going from preschool to public school it seems like she had lost all her senses of Judaism.  I'm really glad we made the decision to send her to a Jewish camp so that all that knowledge could be restored.

This morning the girls asked when we could go to Israel like daddy did.  I told them that one day they will get to go for free since it is their birthright. They asked why mommy did not get to go.  I had to explain to them that mommy was not born Jewish so I did not get the free trip.  They were upset and Isabela told me that instead of getting a lap top with her money she was going to buy me a trip to Israel so I could go with her and Livi on their free trip.  What a sweet kid.

Hopefully we can take a family trip to Israel someday.  Until that day comes I can only dream about floating in the dead sea.

Photobucket

7.15.2009

The Garden- Week 6

The garden is still coming along slowly. I wish I had something exciting to report but sadly I don't. Ryan is building trellises this weekend so next weeks post will be about those.


After doing some research it turns out my big tomato plant is suffering from bloom drop. Apparently it is too hot and too humid for tomatoes right now. I guess I will have to wait until the end of the summer/early fall to get fresh tomatoes.

Photobucket

One of my pumpkin plants have mildew growing on the leaves. I read that it is normal and to fix that problem you have to water around the base of the plant instead of on the leaves.

Photobucket

I think bean beatles are whats eating away at my green bean plants. Still not sure since I have not actually seen any beatles on the leaves.

Photobucket

On a brighter note, my cantaloupe plant is coming along nicely. Like Olivia's fairy house?

Photobucket

It is getting buds and flowers on it.

Photobucket

My pumpkin plant is still growing madly out of control. It has taken over where my butternut squash was and a few other squares as well. It is shading one of my eggplant plants which, ironically, is actually helping it grow. I hope we get some good pumpkins off of it this year.

Photobucket

My zucchini with the cracked, dried out stem is doing great,

Photobucket

4 of my tomato plants have emerged out of their stunted states and are getting thicker stems and some are even flowering,

Photobucket

and we have strawberries growing.

Photobucket


So here is the garden on week 4( I did not take a week 5 pic).

Photobucket

and here it is on week 6.

Photobucket

Photobucket


I guess we need to work on watering the garden less and start watering around the base of the plants not directly over them. Why are gardens so fussy?

7.14.2009

Fabric Covered Outlet Cover Tutorial.

I am currently in the process of redecorating my hall bathroom. Originally I was going to decorate it using all Etsy finds but my plans foiled when Ryan said I could not spend any money on accessories if I wanted a new sink and a finished basement so I had to improvise. Since I am all about crafts and upcycling I decided to use things that I already have around the house to make new stuff for the bathroom. I am not going to do before and after pics of my bathroom until it is all done. In the meantime I will share tutorials of my projects :)

Awhile ago I busted out Ryan's grandmother's sewing machine and somehow managed to sew a straight line. I got so excited that I went online and bought a bunch of fabric from The Fabric Farm only to get it and never figure out how to work that damn machine again. Over the weekend I busted the fabric out of hiding and decided to cover my outlet cover. Here's the tutorial.

Materials:
Fabric
outlet covers
spray adhesive
Mod Podge
scissors

Step 1:
Lay your fabric onto the cover to figure out your design placement. Mine was simple. The fabric I used was a big flower print so all I had to do was choose if I wanted the pink or red flower. Easy. It would be better if you use fabric that has a smaller print. Unfortunately, I did not have another print fabric that would have matched my wall color.

Step 2:
Flip the covers over and draw onto the fabric where the holes need to be cut.

Photobucket

Step 3:
Cut.

Photobucket

Step 4:
Spray the cover with adhesive spray and carefully press your fabric into place.

Photobucket

Step 5:
Flip the cover over and spray some more adhesive to glue down the corners and where the fabric peeps around the holes. You will most likely have to trim the fabric a bit to make it stick better.

Photobucket

Step 6:
Using a foam brush, smooth a layer of Mod Podge onto the fabric rubbing it in really good. When it drys it will be rough. Don't freak out! After applying a few more coats it will feel smooth again.
Note: wait until Mod Podge is completely dry before adding another coat or it will goop up.

Photobucket

Step 7:

Punch a hole where the screws go with scissors or a 1/8" hole punch and hang.

Doesn't the top outlet look like a face on the flower, LOL

Photobucket

Here is the matching switch plate.

Photobucket

Beautiful!

If anyone decided to make some of these please email me pics :)

Edited to say I did NOT paint my walls puke green. I just darkened the background to make the colors of the covers stand out more :)